Windows7 旗舰版安装 Oracle 数据库 11gR2 流程
一、Oracle 数据库是?#
Oracle 数据库(Oracle Database, 又名 Oracle RDBMS,或简称 Oracle)。Oracle数据库系统是美国 Oracle 公司(甲骨文)提供的以分布式数据库为核心的一组软件产品,是目前最流行的客户 / 服务器 (Client/Server) 或 B/S体系结构的数据库之一。比如 SilverStream 就是基于数据库的一种中间件。Oracle 数据库是目前世界上使用最为广泛的数据库管理系统,作为一个通用的数据库系统,它具有完整的数据管理功能;作为一个关系数据库,它是一个完备关系的产品;作为分布式数据库它实现了分布式处理功能。但它的所有知识,只要在一种机型上学习了 ORACLE 知识,便能在各种类型的机器上使用它。
二、安装使用 Oracle 数据库的流程是?#
-
安装有符合 Oracle 数据库安装需求的系统的物理机 / 虚拟机并完成安装前检测
-
下载系统版本对应支持的 Oracle 数据库
-
按系统不同执行不同的安装流程
-
验证安装
-
使用第三方软件连接数据库使用
接下来就一步一步试试吧!
三、实际安装流程及可能遇到的常见问题#
本次流程说明以 Oracle Database11g release2 为例
1、检查安装需求#
在正式安装之前,我们需要做各种各样的前期准备,确认安装系统是否支持对应数据库版本就是其中之一,在官方的《数据库快速安装指南》(English Only)中,有对软硬件的需求,查看自己想安装的操作系统是否在列。
Ps:虚拟内存是?有什么用?如何设置?#
虚拟内存是计算机系统内存管理的一种技术。 它使得应用程序认为它拥有连续的可用的内存(一个连续完整的地址空间),而实际上,它通常是被分隔成多个物理内存碎片,还有部分暂时存储在外部磁盘存储器上,在需要时进行数据交换。 目前,大多数操作系统都使用了虚拟内存,如 Windows 家族的 “虚拟内存”;Linux 的 “交换空间” 等。电脑中所运行的程序均需经由内存执行,若执行的程序占用内存很大或很多,则会导致内存消耗殆尽。为解决该问题,Windows中运用了虚拟内存技术,即匀出一部分硬盘空间来充当内存使用。当内存耗尽时,电脑就会自动调用硬盘来充当内存,以缓解内存的紧张。
Windows7 中,官方文档中提到:
-
通过单击「开始」按钮 、右键单击 “计算机”,然后单击 “属性”,打开 “系统”。
-
在左窗格中,单击 “高级系统设置”。 如果系统提示您输入管理员密码或进行确认,请键入该密码或提供确认。
-
在 “高级” 选项卡上,在 “性能” 下,单击 “设置”。
-
单击 “高级” 选项卡,然后在 “虚拟内存” 下,单击 “更改”。
-
清除 “自动管理所有驱动器的页面文件大小” 复选框。
-
在 “驱动器 [卷标]” 下,单击要更改的分页文件所在的驱动器。
-
单击 “自定义大小”,在 “初始大小 (MB)” 或 “最大大小 (MB)” 框中键入新的大小(以兆字节为单位),单击 “设置”,然后单击 “确定”。
(注意:增加大小通常不需要重新启动更改就能生效,但是如果减小大小,则需要重新启动计算机更改才能生效。建议不要禁用或删除页面文件。)
2、安装对应系统#
在检查好系统后,我们就可以安装对应支持的操作系统了。我这里选择的是安装 Windows7 旗舰版到 VMware 虚拟机中,安装详情应该会单独写一期《VMware 安装 Windows 或 Linux 虚拟机》妥妥的坑。。。
欸嘿嘿,{% post_link How-to-install-Virtual-Machine '《如何安装虚拟机》' %} 已经上线啦!
3、下载 Oracle 数据库安装包#
安装好系统后,就开始下载安装包了,在硬件需求中提到 Oracle 数据库需要至少 5.39G 的包,建议至少预留 6~7G。在官方下载页面中下载安装两个 zip 压缩包,需要同意协议及注册登录,得花费点时间精力。


之后就会开始下载了,要保持网络畅通!
4、安装 Oracle 数据库#
在下载完成后,得到了两个压缩包。将这两个压缩包解压出来,把其中一个文件夹剪切到另一个文件夹,合并在 database 文件夹中。合并完成后,以管理员身份打开安装程序。
PS: 后记,切记 database 文件夹要放在C 盘安装,否则会有无法安装和启动服务的可能性!!!

取消勾选【我希望通过 My Oracle Support 接受安全更新。】

点击下一步进入下一步骤,由于我是在系统中第一次安装,选【创建和配置数据库】,然后单击【下一步】按钮

因为我是在笔记本虚拟机上上安装 Oracle 数据库,所以勾选第一项【桌面类】,然后单击【下一步】按钮

这一步为填写安装路径,如果不想使用默认路径,那么也可以自定义路径,不过路径名称最好不要改。数据库版本按自己的要求选择,当你点选一个后也有相关的说明。数据库名称和密码都输入后点击【下一步】

之后 Oracle 会在安装前检查一下软硬件需求,若有问题则会展示出来。所幸早在第一步就检查了软硬件需求,所以基本上没有问题。点击【完成】正式安装。额,即使真的报错了,只要你认真检查硬件需求那些确定没有问题的话也可以勾选右上角的【全部忽略】来继续安装


在经过漫长等待后终于完成安装,但这时还要进行 口令管理,千万别直接点确定了!!!
在口令管理中,解锁SYS、SYSTEM和SCOTT并手动设置一个密码。完后,点击【确定】

至此,Oracle 数据库 11gR2 就已经安装好了,接下来进行检验。
5、验证安装#
-
现在,理论上应该可以在开始菜单中看到 Oracle 文件夹:
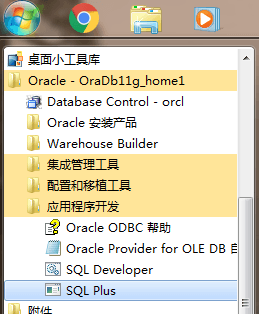
点击 “SQL Plus” 或者 cmd 中输入 sqlplus 都会进入 Oracle 数据库的交互画面要求输入用户名和密码,这里输入
sys as sysdba以数据库管理员的权限登录,并输入之前设置的密码,能成功登录说明运行无误,安装成功!
-
查看服务是否启动
在 cmd 中输入 services.msc 即可查看

没有启动的要手动进行启动。
-
查看 Oracle 端口配置
在开始菜单中查找 Oracle 数据库文件夹中 “Net Configuration Assistant”
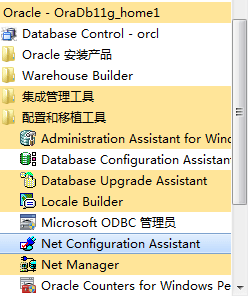
程序初始化后,依次选择【监听程序配置】----->【重新配置】----->【LISTENER | 下一步】-----> 选定的协议中加入【TCP | 下一步】,到这里就能看到 Oracle 的端口情况了,一般默认为 1521,若不为默认的建议修改过来。

-
使用前对用户的一些操作
-
修改用户名密码
进入 cmd,输入
sqlplus/ as sysdba,回车,进入 sql>输入
alter user (username) identified by (password);【这行代码的意思就是修改 system 用户的密码为
(password),这里需要注意的是,代码末尾要加上分号 “;”,不然无法修改成功 】 -
创建用户
进入 cmd,输入
sqlplus/ as sysdba,回车,进入sql>输入
create user (username) identified by (password)【代码的意思是:创建一个用户名为 (username) 的用户,密码为 (password),同样的代码结束需要加分号”;"】
-
设置用户权限
DBA:拥有全部特权,是系统最高权限,只有 DBA 才可以创建数据库结构。
RESOURCE: 拥有 Resource 权限的用户只可以创建实体,不可以创建数据库结构。
CONNECT:拥有 Connect 权限的用户只可以登录 Oracle,不可以创建实体,不可以创建数据库结构。
对于普通用户:授予 connect, resource 权限。
对于 DBA 管理用户:授予 connect,resource, dba 权限
grant connect,resource,dba to (username);
-
OK!完成,至此,Oracle 数据库完成所有正式使用前的流程,可以使用了。
四、第三方软件连接 Oracle 数据库#
这里我们使用 Navicat Premium 为例。
1、Navicat Premium 是?#
Navicat 是香港卓软数字科技有限公司生产的一系列 MySQL、MariaDB、MongoDB、Oracle、SQLite、PostgreSQL 及 Microsoft SQL Server 的图形化数据库管理及发展软件。它有一个类似浏览器的图形用户界面,支持多重连线到本地和远程数据库。它的设计合乎各种用户的需求,从数据库管理员和程序员,到各种为客户服务并与合作伙伴共享信息的不同企业或公司。
2、下载 Navicat Premium 安装包#
通过官方下载页面,下载 Navicat Premium
下载后双击打开,安装到电脑上,这里和平常软件一样无需太过注意
Ps:至于破解请参考 Github 上此项目(有中文文档):# navicat-keygen
安装成功后打开 Navicat Premium。依次选择【连接】----->【Oracle】

在弹出的菜单中输入此前创建的 Oracle 数据库账户信息:输入后点击【测试连接】查看是否能建立连接。
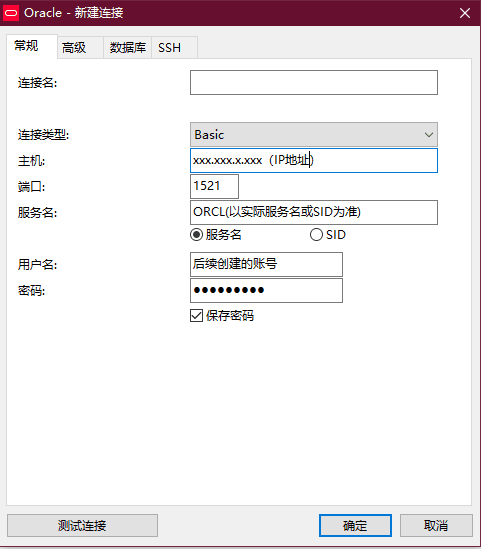
此时若没有报错则万事大吉,Navicat Premium 成功连接 Oracle,但此时若报错【ORA-28547
to server failed, probable Oracle Net admin error】
请参考此篇文章
之所以会报错是因为 Navicat Premium 与 Oracle 数据库文件的 oci.dll 版本不一致导致的。因为 Navicat 是通过 Oracle 客户端连接 Oracle 服务器的,而 Oracle 的客户端分为两种,一种是标准版,一种是简洁版,即 Oracle Install Client。我们用 Navicat 时通常会在自己的安装路径下包含多个版本的 OCI,如果使用 Navicat 连接 Oracle 服务器出现 ORA-28547 错误时,多数是因为 Navicat 本地的 OCI 版本与 Oracle 服务器服务器不符造成的。所以我们要做的就是下载 OCI 使之与我们所安装的 Oracle 服务器相符合。
oci 下载地址,和 Oracle 数据库一样需要勾选和登录账号免费下载
将此 dll 文件放入 Navicat Premium 安装路径\instantclient_11_2 中进行替换。

然后选择【工具】----->【选项】----->【环境】,在 OCI 环境中选择 oci.dll 的位置。之后重启 Navicat Premium 重新连接即可。


参考文章: